Tuesday, September 28, 2010

Getting Ready for the Holidays!

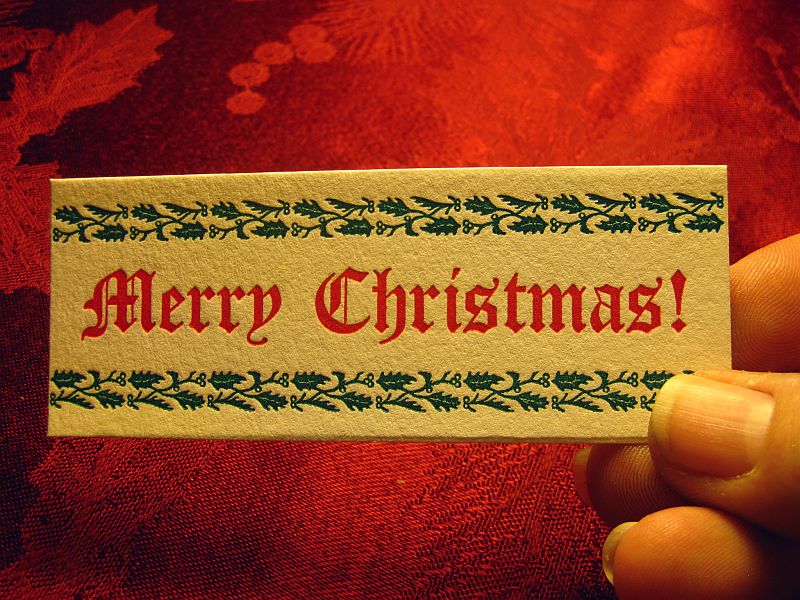
Well, here we go, getting ready for the Holidays all over again. Today I thought I might start off by printing Christmas tags. These are larger tags, 4 x 1.5 inches, almost bookmark size. They can serve as a gift tag . . . or a micro-Christmas card. The perfect thing to slide under a windshield wiper or in a door jam or any place where you might wish to slip a discrete Christmas greeting. Or . . . use it for a large gift. I like to use this sort of thing to accompany a tip at a restaurant. These will be banded in quantities of ten.


The text is set in 30 point Chaucerian Black Letter. The Holly border font came from Quaker City. The Blackletter font is about fifty years old. Possibly older. Colour is process red, oil base, and process green, rubber base. Paper stock is 110 lb cotton rag (Crane Lettra.) You might be able to see from the photo how nicely this open fibre stock gives way under the pressure of the impression, leaving a nice debossed print. Ahh, classic Letterpress!

These are limited quantity. While these are being produced for friends and family, I will make the remainder available for purchase if anyone is interested. Just e-mail me at wd4nka@aim.com for pricing. I promise a hard to beat price for a two colour hand crafted Letterpress Item.

That's it for this installment. Short and sweet.

Good Providence in all your Letterpress Endeavours!

-gary

G. Johanson, Printer.


Tuesday, September 14, 2010

Finishing the Scratchboard


Here it is, finished up and "cleared out". The "clearing out" part meant scraping the white areas because ink dust from the stylii and the brush can actually tone the white areas in the same manner as graphite dust. What you see in the foreground are my makeshift tools: an Exacto knife (for clearing broader areas), a stick-pin in a brass optical reamer holder (use the needle for fine areas and for layout outlining - depending on the needle, the line produced can be so thin as to serve as a guide line which can be easily scribed over), and a Mabelene mascara brush to wipe away scribing dust, yet not so heavily so as to rub it into the white clay area. Yet another tool is a fine point Sharpie for corrections. I would have used my Rapidograph, but when cleaning it this morning I discovered the pin plunger in the venturi had broken somehow. It's now a casualty.


Here is a bit better view. Just to review, what I did today was finish out the flywheel, the ink disk and the drawers. This particular press is actually a Golding Pearl Old Series 5x8", using the three drawer storage table. My actual Pearl is larger, 7x11, and uses the two drawer table. The drawers are bigger. Those of you that follow my blog and know your Pearls might also note the roller hook journals were adapted from my 7x11. The 5x8 in the engraving that I photocopied had something different, and it wasn't clear just what I was seeing.


Yet a closer look at some detail. Here is where the "woodcut" nature of scratchboard or Clayboard really stands out. And to be truthful, my earliest background in graphics and pen and ink rendering as a kid of 7 or 8 years old was copying cuts from Duerer and engravings of Theodore De Bry. I loved how the hatching of lines could produce a building up of tonal values. Then later, I was introduced to a gentleman named Thomas Bewick, and a whole new world of white on black line scribing technique was introduced. All this to say, the natural wood-cut 'look' is most likely further enhanced by my personal technique, which is very wood-cut influenced.

Boy, I talk a lot, don't I?

Well, anyway, that's it. I may attempt to plate this, but I think I will hold off on that until the next experiment which I hope will be something that will eventually end up being printed on paper - via the iron Letterpress, of course!

BTW . . . I ain't no Bewick. :>)

Good Providence in all your Letterpress Endeavours!


Monday, September 13, 2010

Scratchboard Technique for Letterpress

I wanted to produce some very high contrast artwork for Letterpress use. I can't think of a higher contrast media than Scratchboard, or "Clayboard". This is a media that I used with my first Letterpress operation "Heirloom Press" in Palm Harbor, Florida. Back then, the images were shot using high contrast line film by Southern Engravers. These days, this sort of thing is scanned and processed as a vector image, then sent to a plater for a Letterpress die.

The above subject is a Golding Pearl Old Series No. 3. I used both the photocopy of a 19th century engraving and my own 1909 Pearl. Hence, some differences.

Clayboard, or Scratchboard, is traditionally a stiff paper or board [in my case, tempered masonite] layered with a white clay or chalk substance, then covered with an even coating of black India ink. The idea is to scratch through the ink to expose the white clay beneath. The result is essentially an engraving, which can very much take on the personality of a woodcut or wood engraving. The size of the above piece is 5x7 inches.

Here is a close-up. You can see that I am not yet finished, I have yet to do the ink disk and flywheel. Then, I'll "open" up the white background to create a black border. Now, this is my first crack at doing this in twenty-odd years, so the old hand-eye factor is a bit rusty. Critical evaluation tells me that this particular image may not be so well suited for plating, the lines on much of the shading are really too thin, and will not reproduce well as a vector. If I send a high pixel image (1200 dpi or higher) to be reproduced photographically it would be a trick to keep the very shallow lines from filling in. So my next attempt will be less "shaded" and more "woodcut" looking.

I will add that Clayboards can be touched up with pen and ink. Just as the ink is scratched away, corrections and additions can be made by re-applying ink, letting it dry, and doing a re-work of any given area. I will probably take a Rapidograph pen to some small parts of this piece.

I want to create a Kelmscott Press looking Book Plate. I think this technique can provide a good artboard resource.

That's it for this installment. And as always, Best of Providence in your Letterpress endeavours!

Monday, August 30, 2010

An Eleventh Hour Announcement/ RSVP Run.

One of the things I do is design work for a local ministry, the Central Florida Pregnancy Center, located in Deltona, Florida. Each year they sponsor a very nice, rather upscale fundraising banquet at the DeBary Golf and Country resort. It's been my pleasure to have been involved with this function, now going on three years.

This year, we decided that I not only design this year's banquet announcement, but print it as well, taking advantage of the virtues of Letterpress Typography. (Read: nice deboss into Crane Lettra . . . of course!)

The design we settled on this year called for something more dramatic than the relatively flowery, or sentimental designs of the past. This year they wanted an announcement that would announce like a trumpet. So we chose a two colour design featuring a central silhouette of a blazing torch, with rays extending from the centre of the card to the outer border.

The border and text are Van Sonn's process purple. The torch and rays background is an 8:1 mix of process yellow and opaque white. Since purple is compliment to yellow, the text fairly jumps.

These announcements resemble more a handbill than a typical announcement, owing to the dramatic design. It would actually make a great poster. One dynamic that feeds this is it's outsized dimensions: 5x8.5". It requires a 9x6 envelope.

Since it is, in fact, hand designed and hand printed, Q5 Studio and I consider each copy a limited edition collector piece. But I opted not to sign and number each of the 350 copies!

Accompanying these announcements are, of course, RSVP cards, as shown below.


Each impression was "double rolled" on our Chandler and Price New Series 8x12 platen press, which did a good job. I would not suggest a steady diet of large deep deboss work on a press of this size: a Kluge is better suited for this, if large areas are required for such high pressure work. However, the 8x12 is perfectly suitable for standard announcement sizes requiring debossed open fiber stock work.


Here is a close-up of the RSVP. Border registry was pretty tricky. But we managed to bring the rays almost exactly to the outer edge of the border. There were a couple drifts owing to minute finish cut size differences. I had less than 0.25mm tolerance to playwork with.


The 5x8 announcement required both double rolling and double striking in some cases. Whenever you have a die that carries lots of ink surface, especially broad, unbroken areas of colour, you have to look out for: even pressure and ink distribution. These types of designs can become very thirsty on a letterpress, and to keep an even layer of ink on each impression, the ink disk had to be reloaded every fifty impressions. Definitely could have used an ink fountain on this job. The RSVP cards were not nearly so thirsty, but the colour registry was twice as critical.


The paper used was Pearl White Crane Lettra, supplied to us by none other than Mama's Sauce Printery, Orlando. Thanks again Nick. And next time I do something bigger than standard greeting card or announcement card sizes that require some dig, brother, we'll use one of the Kluges down there, ok? :>)

All dies were 16g. magnesium, wood mounted by Owosso Graphics, who did an awful lot of work, put up with an awful lot of phone calls from yours truly, and got them to Q5 Studio & Pretty Good Letterpress awfully fast. You guys are the best.

Well, this is pretty much it for today's installment. I might add that the total run time for the project as a whole was about 16 hours, backing out the drying time and the time taken to do the layout and vector design work. Average impression speed factoring double rolling and double striking can run impression cycles up to over ten to fifteen seconds for each impression, as compared to the normal 3 seconds. This job definitely required hand feeding.

Good Providence in all your printing and Letterpress endeavours!

-gary.

Tuesday, June 29, 2010

Coasters, Part 2: "The Run"


The finished product! Turned out better than we, the staff at Q5 dared hope! So, while we're all slapping each other on the back and lighting each others' celebratory Black & Milds (wood tipped for that extra dose of erudition), let's take a look at some of the distinctions that make Letterpress and Drink Coasters such as these unique. For one thing, most beer-mats and other pulpwood compressed fibre coasters are printed offset and die cut. Great for speed and maybe even keeping costs down to a dull roar, but the surface of the product remains boringly flat. And while the mass produced coasters may have four and five colour process, those colours tend to be less than striking. Oh, don't get me wrong, as a huge fan of Beer Coaster art, I've seen wonderful coaster designs, but very, very few that rise to the level of "striking".


With Letterpress Typography, there is a visceral contact of the metal plate against the printed surface, particularly with pulp coasters. This contact pressure leaves an emboss which is not only visible and touchable . . . but quite aesthetically pleasing to behold. Note the wood engraving which is the central image has recessed, or "sunk" into the coaster. The brown circle is debossed into the coaster as well, leaving the letters to "rise", or emboss. You don't get that with mass produced offset products. And for you other letterpress printers, note that the pressures needed to produce these effects with coaster stock is in no way unusual or dangerous to the press or dies. Coaster stock is fairly soft and gives. I never stress my presses!


Here's the other coaster. The coaster is correctly positioned straight up: the balloon is at an angle because it is in flight. The detail of the engraving is superb, all the way down to the weave of the basket of the gondola, the sandbags, and the pilot pointing down to the earth below. These dies are the excellent work of our partners in crime, Owosso Graphics, the exclusive plate and die makers for Q5.

Join us in viewing the final wrap-up video of "The Run". From makeready to stacking the finished product for overnight drying, this project took about eighteen consecutive hours to print. As you view the video, you will note that the impression is taken every second cycle of the press, that is, you will see the "clamshell" platen close twice for every one inked impression. This is called "Double Rolling", and is a technique used to provide superior spread of ink over large, unbroken areas of colour such as the colour ring of the coaster. This, effectively, doubles the printing time.

I might note at this time that the brown ink is of particular note. It was purchased in quarter pound tubes from the Kelsey Company in 1980. The ink is thirty years old! It was as fresh as if it were brand new. The colour was a deep, rich chocolate. I couldn't have asked for better. And rest assured, my future ink purchases will be in tubes!

A thirty year old tube of Kelsey Brown Oil Based Ink.

The music that you will hear in the background of the video is from Beirut (the band, not the Country!) - part of the music line-up in the Shop, including Ingrid Michelson, Iron & Wine, Sufjan Stevens, Tallest Man on Earth, Band Marino, etc.

. . . we're an "Indie" shop, after all!


Well, that's about it for now. Hope you've enjoyed going over the Coaster Project half as much as we've enjoyed making them. And note that Q5 can make these for order as well. Interested parties should contact gary, chief cook & bottle-washer at: wd4nka@aim.com

Good Providence in all your Letterpress Endeavours!

-gary.

--.- // .....

Coaster Makeready: the Video


I received a request to explain how I set up my Job Press to run pre-cut round coaster stock. I thought that probably the best way to explain it is by video, with soundtrack courtesy Iron & Wine.

The video is about seven and a half minutes long. What you will see is the preparation which consists of one sheet of hardboard, one sheet of bond paper for padding, another sheet serving as the Tympan sheet, and a wax paper overlay. The wax paper came from the kitchen. Any transparent sheet - or one that comes close to transparent - will do. We use this to help center the coaster stock to where the printed image falls on the Tympan, after an imprint is made on the wax paper. Once centered, the coaster is held in place, the wax paper removed, a circle is drawn around the coaster, gauge pins are set, and in our case the impression was spot on!


The video was shot on the second day of printing. The impression is taken from the black "key" die for the front side, or 'obverse' of the Balloon coaster. There will be more photos to come as I manage to squeeze time to post them. Stay tuned.

Good Providence in all your Letterpress endeavours!

-gary


Tuesday, June 22, 2010

Coasting Around on Letterpress


An order for 900 coasters. Actually, I ordered one thousand. Figure about 10% for "waste", but that figure may be rather high. These are drink coasters for Deltona Alliance Church's College and Career Group. These drink coasters are 4 inches in diameter, 2.0 mm thick. As far as coasters go, they are the real deal, ordered from a national branding supplier.

Today was spent printing the reverse side, which is single colour, black. The font used is Bickham Script, with Celtic harps surrounding 358 degrees of circumference.


The image imprinted nicely, without registering any protestation from the press. If there is too much pressure, my 8 x 12 New Series C&P lets me know by the way it literally "feels". After you get to know a press, you can actually sense certain things. One telltale is rhythm. Another is subtle sound changes. Still another is might be a change in the dwell.

The pulp-board composition of these drink coasters make it ideal for debossing without heavy driving. I do not like to "drive" my forms, and I refuse to punch my metal type. But on this surface, deboss comes naturally. The photo above has the light held aslant the coaster's surface to enhance the overall effect photographically. By the way, just about all those images you see on Letterpress sites do the same thing. The depth of shadow can really play the deboss depth depending on the angle of the light to the surface. Just thought I'd toss that in there. When you actually hold the coaster and look at it critically, you see a nice image, conservative depth, and good, sharp detail. You do not get the "Grand Canyon".


Here is a full-face view of the coaster reverse. One of the genres of Letterpress Printing that Q5 Studio & Pretty Good Letterpress would like to investigate is "Branding" with various coasters. We can obtain three different thicknesses, 1.0mm (thin), 1.5mm (medium) and 2.0mm (thick), both round and square (with rounded corners), in two different diameters, four inches being the widest.

One use for these coasters that I have seen more and more lately is for Wedding Announcements! Just think . . . . bring your own coaster to the reception! How thoughtful. But a very creative idea.

I will be posting more as we proceed with the obverse (front side) printing, which will be a two colour affair.

Stay tuned.

-gary