Pages

Tuesday, February 17, 2009

Continuation of the Pearl Delivery and Feed Board Project


Last week I walked into the shop to find my nicely glued delivery board half on the bracket and half on the floor. Seems the wood dried one way, the glue the other. It split right at the glue joint. So I did a little planing of the split edge with a block plane to take out a slight bowing of the wood, re-glued and re-clamped. I left it clamped for about 4 days. This morning I un-clamped it, and mounted it on the Pearl's table bracket using two horizontal lengths of oak as an underside batten bracket. I also glued and nailed the thin delivery boards' back strip onto the delivery board as well. While I was tempted to both glue AND screw the oak battens beneath the table, I figures that it wouldn't be really supporting all that much weight, so I settled for screwing it on, and leaving it be.

Here are some shots.


This is an underside shot of the main table, what I call the "Delivery Board" because I "deliver" the printed material to this board. I feed from the upper board. Maybe I have it backward, but it's the way I do it. Anywhoo . . . .
Note the battens also serve as a stand off between the iron brackets and the table itself. Sort of killing two birds with one stone. Now, that frontmost screw is biting a bit close to the actual glued split itself, but so far, so good.


This is the underside of the swivel feed board before I attached it. I thought I might show how the hardware integrates with the board. What you see here is all the hardware involved: a bracket for the underside of the board itself, which provides support, an iron stand-off "pillar", a long shouldered screw with three washers, and a nut.


This is a closeup of the hardware. I painted the iron stand-off with black oil-based Rustoleum, as well the bracket. I did not paint the screw or washer. They didn't really need it, anyway.


First, you slide the screw through it's hole in the feedboard. That hole has a metal grommet actually recessed into the wood. For it's simplicity, the design is very purposefull. After insertion of the screw, two of the washers slip over it, as shown.


Next, the iron stand-off is slid over the screw, and under the two washers. It's the slip between the two washers that enable the table to swivel.


The assembly is then threaded through the hole on the delivery board, the last washer slid over the screw on the base, and the nut tightened down, securing the whole assembly. This nut is tightened quite a bit. The table swivels well, but not loosely or with any degree of "flop". All things considered, it's actually a pretty good design, and best of all, absolutely reproduce-able. A cut length of conduit or even copper piping and a washer can be substituted for the iron stand-off.


And there it is! Glued, Stained, braced, assembled and mounted. Who would have thought two pieces of wood with absolutely no joinery would take almost two weeks to finish? I was torn between varnishing the tables or just letting them be with the finish as it is. I think I will leave it as is. I might rub some Danish or Tung oil on it later.


I also put the finishing touches on the drawers. Basically, I took some very fine grit sand paper and lightly sanded the "hackle" off. Some of the New England cabinetmakers would spray their wood with water to raise the hackle, and sand it down the next day before applying finish. Here you can see a little of the inside of the drawers, just to prove they're real, and not faux fronts (grin). In case you're wondering, the drawers were stained with the same orange lacquer stain used for the feed and deliver boards. Two different results! But all in all, she turned out pretty good, I think.

Now, we await rollers.

Good Providence in all your Letterpress endeavours!

-g.


Just added: there have been a number of requests for my table dimensions.  They are as follows:
Lower board: 7 x 17-1/8 inches
Upper board: 7-3/4 x 23 inches
Backboard is a thin strip running along the back of lower board to within one inch of each edge. You might be able to ascertain the arc of the curved corners by the photos.

There has been some discussion on the Pearl Restore group as to the authenticty of my swivel mechanism.  So far as I know, mine is original to the press, but we have also ascertained that there has been a number of hardware changes regarding these bolt-on items over the years by Golding, so it's pretty hard to establish just what is original.  My best advice here is that if two or more Pearl owners have the same hardware, chances are pretty good that either A)- it's original, or at least authentic to the press, or B) - it was a known aftermarket piece, and probably a safe bet that it was widely used.


Sunday, February 8, 2009

Sanding and Finishing the Delivery and Feed Tables


The wood filler was fully dry by this afternoon, so I took the orbital sander to the delivery board (which I believe is the lower table), the feed board (which would be the other, swivel or "swing-away" table.) Better double check me on that, I could have it backward. But I feed from right to left, so to me the right most table would be the board I feed from.

Anyway . . . Sand I did. I wound up taking it down to the bare wood after all because I needed to smooth out irregularities. The distress marks in the wood are still fully there. I uncovered things that were painted over, too. Remember those photos of the prior glue job where I showed the drips on the bottom of the table? Well, whatever sort of glue that was, it was used as a filler, too! I sanded down to where at least one hole is visible. No clue what sort of glue they used, it looks as white as caseine.

I was advised that the original laquers used were of an orange or amber variety. Upon cleaning the boards after sanding, I applied just that, an orange-amber, which really brought out the grain in the wood. The distress marks show well, too. The colour is really quite pleasing, gives a sort of aged look, not unlike an old school desk.


What you see is a stain with a finishing agent. It's Minwax's "Gel Stain". When this dries, a coat of varnish will be applied, wet sanded with steel wool, then another coating applied.

Also receiving attention is the metal hardware associated with these tables, the steel feed-through stand-off and collar, bolt, washers and bottom brace for the swivel, which I sanded and wire-brushed with a dremmel, then spray coated with Black Oil Based Rustoleum. After a few hours, the hardware was dry enough to handle and photograph, as viewed below


My next day off is Thursday, so the paint should be set enough to begin installing. Meanwhile, I'll be applying the varnish between now and that time, hopefully. I may add that the way the swivel works is by slippage between two washers. Those washers cannot be painted, the paint would cause too much friction, not to mention peel the paint away. Rather, they need to be lubricated. The way this swivel works is like this: A long, 4" bolt feeds through a collared hole in the top board, feeds through two washers, the long stand-off, through the bottom board, steel bracket, through another washer, and then terminates with a quarter-inch nut. The bolt itself is similar to a carriage bolt: rounded head with square shoulder just under the head.


I took a look at the drawers I made last week. Remember, these drawers are intended to be temporary, but since I had the sander out, I decided to sand the drawers, too. Upon inspection I noted that the pine was doing what I had suspected it would do: retract and warp right after you work it. Pine these days is really nothing like the pine of 100 or 200 years ago: the Foresters in the yellow pine forests of North Carolina will tell you that today's pine is a mere shadow of the robust stock that grew in the last century. The quality is by far inferior. I have heard this from carpenters of my grandfather's generation, too. And being part of one of the founding families of North West Indiana which still has a Homestead on the premesis, there is plenty of pine woodwork from the 19th century to tell the same story. It's been only five days and the wood is already pulling from the nails. So, I began to get a bit aggressive: wood glue, clamp, and if needs be, dowel the drawers. They will be replaced, sure, but I don't want them falling apart, either! I am also staining the drawer fronts to match the boards as well.


Is it my imagination, or are the drawer pulls making the drawers look like they're smiling? Hmm . . .

The drawer that seemed to have the worst problem with retraction is the one with the pipe clamps. Sanding actually helped the movement of the drawers, too. I rounded the angles and corners a bit, which makes them slide easier on their courses.

I have two more photos to share as a parting shot. These photos of the sanded and stained backboard which was nailed to the back of the feed board. It will be re-attached with hardwood doweling and glue before the varnish goes on.


That's it for now. I figure between the boards and the drawers, I may have another two weeks of work (which, being interpreted, means two full days of work, a couple of my days off.) to finish the project. I'll keep posting the progress.

-gary

G. Johanson, Settlement Printer.
Florida Pioneer Settlement for the Creative Arts.


Saturday, February 7, 2009

Rehabing the Feed and Delivery Tables for the Pearl O.S. No. 3


You may recall a few months back that I made a new poplar table for the Pearl, but something in me said that nice as it looked, all new and everything, something looked amiss. I mean, it looked ok, but something was just not right. A little probing around the area where the Pearl was stored produced the original tables. But time and the climate had done it's dirty work. Thankfully, the tables had a good coating of shellac on them, but the hardware was a bit rusty, and the expansion and contraction of the shifting humidity and temperature had rendered two large splits down the middle of both tables. These were not clean splits, either. To make matters worse, the prior owner attempted to glue the two halves of each table together again using some sort of hide glue, with no attempt at wiping the excess and, from what I can tell, no clamping. In a word, it was sloppy.


Whoever did the original repair may have been a good printer, but woodwork may not have been the strong suite.

My original plan was to simply use these tables as a template for a new board. But recently I was challenged via e-mail to try to bring those tables back to life. This suited the overall project actually better than my original idea, so I took up the challenge.

The first thing I did was to perform a simple operation which I learned years ago from my former Pastor's wife, who was an excellent cabinet maker. We restored a tabletop with similar problems by ripping a kerf directly thru the split on a table saw. In my case, because the rip travelled farther than the blade was wide, I had to make two rips. This shortened the width of the table by a quarter inch, but I had two clean edges to glue together. Upon the initial rip, I noted the table was made of Cherry! Hard to tell through a century of dust, ink and crud.

This is the larger of the two tables, the delivery table.


A bead of wood glue right across the cut, spread, the excess applied to the other half of the table.


The two halves are then tightly clamped together. I like pipe clamps because the pipe itself provides a handy level surface for the table which can help prevent the surface from "bowing", at least backward. Lateral clamping may be necessary if the surface bows the other direction, however. The delivery table behaved well. However, the feed table did require two steel plates clamped laterally (top and bottom) to keep the surface level. These I set out overnight to dry and harden.

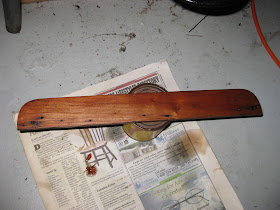
Today I inspected the results. There were still some fine irregularities in the sides along the kerf, which means that I should have ripped the split wider, but nothing a little wood filler couldn't handle, as the next two photos show.


So, here we are at this point. The tables are glued solid. The wood filler is drying. Next step is to sand. I want to keep some of the original "look", so I am not going to sand the original finish all the way off. Actually, I kinda like the distressed look of wood on machinery. But I want it to be functional and dependable, too. I may re-enforce the repairs beneath each table with iron strapping. It wouldn't be visible from the surface. But then, these tables do not see an awful lot of weight, so I may just wait on that for a while.

The Hardware awaits cleaning, "de-rusting" and repainting with the same black oil based Rustoleum used for the rest of the press.

Final coating for these tables may be orange shellac. I was advised this was the original finish. We'll see if I can locate this product. If not, I will use cherry stain to match the wood, then varnish.

Here are the tables where they are now parked, awaiting sanding.


Well, more to come. Stay tuned.

-gary

G. Johanson, Settlement Printer
Florida Pioneer Settlement for the Creative Arts


Tuesday, February 3, 2009

Drawers for the Pearl (and other stuff)


So, what do you do when it's your day off, it's the last day before payday, your pretty well out of funds, your cat of 13 years dies and you need something to distract you for a while? Make drawers, of course!

Now, I'm like any other guy, I like war movies, Indian Jones, rugby, flat-water canoeing over miles of open water, shooting old Smith & Wesson revolvers, and restoring WW2 era transmitters and receivers, putting them on the air and talking around the world on the most challenging of modes: hand sent code. I like an occasional ale, smoke cigars, play blue-grass guitar and rewire the electronics in my old Volvo. So, I'm your fairly ordinary guy. But man, I hate it when my pets go the way of all flesh. They are part of your daily routine for 10, 13, 15, in one case 19 years, and then they bid farewell. And it takes me a solid day to get over it. So when it comes to my dogs and the one cat in my life, yeah, I'm a sap.

So, I grab some extra lumber I had laying around. Aww, it's pretty beat up yellow pine. Well, let's do some ripping and cross cutting, and at least make some temporary drawers for the Pearl, anyway. Later, when I can afford it, I'll go ahead and do a proper job with hardwood, but till then at least I'll have extra storage, and the Pearl will have something new to wear for the time being.


The dimensions of the drawers are pretty simple, really. The front opening is 13" wide. The front and sides need 6.5" for clearance. The sides are 12.5" long. Once the front and sides are assembled (I used glue, clamps and an air nailer to attach the "butt" joints. No fancy joinery here.) I cut a 4" by 11.5" plank for the rear, which fits between the two sides, and inset the bottom with a few boards cut 11.5" long and widths varying in such a way as to provide a solid bottom with no gaps. The bottoms also fit between the two sides, and are glued and nailed along the sides. I used 1.5" brads and a brad nailer. Very simple but it works. Later I'll use these dimensions and use lap joints with poplar sides and an oak front. There is also a person casting the actual drawer pulls for the Pearl OS No. 3. So a more authentic drawer project still looms in the future.


Upon completion, they slid right into place, pretty as you please. I had some iron spade-head pulls laying around, so I used these. Remember: the idea was to not spend money, at least not now. So, yeah, it's not the most authentic.

Hey! What's the deal with the Feed and Delivery tables? Didn't I make a new table a few installments ago? Yes. But guess what? The originals turned up. And they are much more proportionate to the press, so I will be making new ones patterned after the originals, using the original hardware. The original wood is not really pretty, and the splits from about 50 years of expanding and contracting is quite evident. New wood is certainly needed.


Here's a closer look. Not too shabby, if I may say so. Gives the Pearl a bit more of a finished look, such as it is. In those drawers will go a brayer, hand held slug cutter, stencil brush (I use stencil brushes for everything from cleaning presses to cleaning type) and probably some tympan paper, pins and large rubber bands.


While I was in wood-working mode, I decided to hang a cabinet and "clip board". Paper, my cutting and engraving tools, carbon paper (thanks, Phil Ambrosi!) birch and Lino-blocks will be kept here. I make my own Linoleum blocks, birch ply backed. You can see them stacked up top. The clips are just old style spring clothes pins glued to the board, to which proofs, copy, or job orders can be posted.


*Sigh* but I still have some challenges before I have what I consider a truly functioning shop / studio. For one thing, see those type trays stacked up behind the Pearl? Those are really all the California cases I have. I'll have to double lay all 6 drawers. I need to make a cabinet for them soon. Do you see the cabinet under those 6 drawers? It's a crudely made open rack for half-cases, of which there is really only 2. Those others are poorly nailed-together trays that will be discarded. I'll salvage the angle aluminium for drawer running tracks when I make the cabinet for those California Job Cases. That blue table, believe it or not, is an original Kelsey "quarter case" cabinet. I used this cabinet with my small Kelseys back when I owned and operated "Heirloom Press" in Palm Harbor back in the early 1990s. But the years of storage up at the Pioneer Settlement has, for some reason, had a deliterious effect on it. The seams are coming apart. Right now, to keep it from collapsing, I have a pipe clamp bracing the bottom. Some utility person up at the Settlement removed it's wheels, too! Why, I have no early reason, so I have to scout around the campus for those, too! A 5x8 Kelsey mounts atop this quarter cabinet. I still have the original booklet and some unwrapped Kelsey type to wade through, and I need to get rollers for the Kelsey. I also need a genuine imposing table and stone, and a guillotine cutter as well. A roller rack and cleaning station needs to be made, too.

Rollers and truck for the Pearl are the next item on the agenda. Both NA Graphics and Tarheel Rollers have offered to work with me on procuring what I need, both rollers, cores and trucks, which will probably be delrin. They are pretty costy, moreso than the C&P. I think rather than go rubber as I did with the C&P, I'll use traditional composition rollers. That way I can use Kerosine for clean up with a clear conscience. Right now I use it on rubber, and have had no ill effects, but you're really supposed to use a water miscible (sp?) cleaner for that.


Here's what I am using for imposition right now: the type bed of my old 9x13 Kelsey. The rails make handy carrying handles, and the iron is perfectly graded. The chases for the 8x12 C&P fit nicely. The Pearl 7x11 chase fits, of course, as well.


The last shot of this installment is a view of the whole imposing table, which is actually an Eastlake Victorian marble-top dresser. But rather than mar the marble, I opted to cover it with a quilted blanket and an oak table top. You can also see the table-top mounted slug cutter next to the "imposing stone".


Well, guys, that's it for this round. I might add that recently I got an eMail asking if I could help a group in the process of restoring a Pearl. I am glad to help all I can, and am also happy to know that my blog has been helpful for others endeavouring to do what I have been attempting. The Pearl is a fun project, and it does come fairly well apart. There's lots of room for personal creativity, too, such as doing the woodwork, for instance. Feel free to contact me directly as needed. Whatever I don't know I can post to the LetPress list. Stephen O. Saxe is a member, who has helped me in the past with historical info on the Pearl. By the way, you can date your Pearl by it's serical number located on the type bed directly under the ink disk.

Good Providence in all your Letterpress endeavours!

-gary

G. Johanson, Settlement Printer
Florida Pioneer Settlement for the Creative Arts
Barberville/ Deltona Florida.